Thursday, October 24, 2013

Life is like a Camera... Focus on what's IMPORTANT!


Happy Thursday! I decided I would share a card I made a few days ago to get me away from the computer screen for 30 minutes. My eyes needed a break! LOL! :) I picked up this adorable stamp set from Taylored Expressions when I was at Archivers one day. Of course I had to buy it since I am a photographer! :) I love it!

It seems the only stamping I ever do is making Thank You cards for my clients packages these days so I thought camera stamps would be perfect! :) I used the new Spectrum Noir markers to color the main image. I am still getting used to them, but they do a great job for the most part! :)

I hope you like it! Have a great day!
Hugs and Smiles!! 

Thursday, October 17, 2013

Spectrum Noir Review | Happy Halloween


Happy Thursday! I hope you're having a blessed week! I wanted to do a very quick review of the Spectrum Noir alcohol markers that I picked up a couple of weeks ago. First of all... I have been a copic marker user and fan for years! So I was skeptical going into trying these, but at $12.99 for a pack of 6 colors... I had to try them!! 

I will say that they aren't as easy as copic markers to blend, but they still do a beautiful job! If you use momento tuxedo black ink and a sturdy cardstock then you will do great! It just takes some getting used too. :) I thought I would post a little card using them and I really love how it turned out! I have close to 200 copic markers which I love too, but for the price you can't beat these in my opinion! :) 

If I ever get time (which may be like January) then I will do a video tutorial and review. :) 

Hugs & Smiles! 


Sunday, September 22, 2013

Homemade apple pie using Hubers orchard apples

Last weekend we decided to visit Huber's Orchard in Starlight, IN for a few hours of family fun. We had a wonderful day and at the end we decided to take home a large bag of apples off the orchard. :) I had in mind making a lovely homemade apple pie! :) 

Since today is the first day of fall and I finally took a day off work I decided to make that pie! :) It came out amazing!!! And is one of the best tasting pies ever! I found my recipe online somewhere but I will put the directions below with a few pictures. :) Enjoy! :) 

I found the recipe! It's from allrecipes.com. :) 
Peel, core, and cut up your apples (7 of them)... Or if your kiddos are like mine you may need 8! Grant ate a full apple as I was cutting them up. Lol! 
Mix your sugar, flour, cinnamon, nutmeg, and salt together... And start adding your apples... And mix! 
Put your first pie crust in the pie plate and later in your apples! Then dot your apples with butter before adding too crust. 
I found these adorable little pie crust cutters for $1.99 at Target and thought they were perfect for an apple pie! :) 


Please don't mind my dirty oven! Lol! I baked my pie at 425 for 10 minutes... Then turned down the heat to 300 for 50 minutes... The. Removed the crust saver and baked for 10 more minutes on 425! :) 


And here is my final pie and it tastes so good!!!! :) Enjoy!! :) 


Friday, September 13, 2013

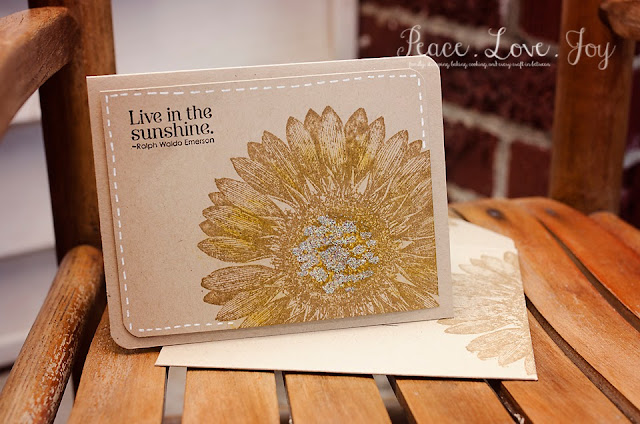
Live in the Sunshine and Envelope

Happy Friday! I hope you're having a great evening! I rarely ever stamp anymore, but I still enjoy it if I ever get the chance. I have a ton of editing to do for my photography clients, but I stopped for about 15 minutes today to throw this together! I even made a matching envelope with my new envelope punch board! I am totally addicted to that thing! LOL!! :-) I used the large sunflower stamp from Stampin' Up! Love the "Live in the Sunshine" sentiment! :)

Enjoy! Have a great weekend! 

Blue and White Swirl Cupcakes

Howdy! This post is a few days late, but I wanted to share what me and my little 4 year old created. :) G absolutely loves to mix all of the ingredients, crack the eggs, and fill up the pan for baking. :) I do believe his favorite part is eating the finished product tho and all the praise he receives for a job well done! :) I am an extremely busy photographer and mommy! G started preschool last month and I feel like I am always looking for a way to make our time together more special. Even if I am stuck at home editing for hours upon hours I will take time out once a week to let our kitchen get messy and allow G to help me create something new! :) We
Decided our cupcakes needed blue icing so we gave some blue and white swirls a try! Lol! :) 

Have a blessed day! 


Wednesday, September 11, 2013

Royal Icing Recipe

Howdy! I am absolutely no expert, but I have been asked several times what royal icing recipe we have been using when we bake our fun cookies. :) I currently love Wilton's recipe. I will put the recipe and directions below for you!!! :)

Have a blessed day!
_____________________________________________________________________________


Ingredients:

Makes:

About 3 cups of icing.

Instructions:

step 1

Beat all ingredients until icing forms peaks (7-10 minutes at low speed with a heavy-duty mixer, 10-12 minutes at high speed with a hand-held mixer).

step 2

NOTE: Keep all utensils completely grease-free for proper icing consistency.
* For stiffer icing, use 1 tablespoon less water.
**When using large countertop mixer or for stiffer icing, use 1 tablespoon less water.
Thinned Royal Icing: To thin for pouring, add 1 teaspoon water per cup of royal icing. Use grease-free spoon or spatula to stir slowly. Add 1/2 teaspoon water at a time until you reach proper consistency.

Tuesday, September 10, 2013

Fall Leaf Jar

I made a Pinterest project the other day after taking me a few days to figure out what I was doing. I first tried to use fake leave but they wouldn't stay on the jar. Lol! So I tried leaves that fell off a tree across the street. They didn't stick either. So finally I flattened and dried the leaves for 2 days in a huge animal dictionary we have. Lol! Then it worked! I used a ball jar and mog podge to attach the leaves. :) Allowed it to dry for 12 or so hours. It dries clear and when you put a candle or lights inside it is absolutely beautiful. :) I personally like a candle in it but I was out if votives so Christmas lights had to work! Lol! :) 

Enjoy! 


** I finally got a votive!


Wednesday, September 4, 2013

Sugar Cookies with Royal Icing


My little guy started preschool a couple of weeks ago. I signed up for treat week last Tuesday so I decided to make some sugar cookies to go with that weeks theme! Dinosaurs! :) I researched on YouTube how to flood cookies with royal icing! Needless to say I am addicted! I absolutely love doing it and enjoy how pretty the cookies are that come out! :) Above are some pictures of the cookies I made for G's class. :) Below are some other so made for his 4th birthday pirate pool party and some Halloween ones he requested! Lol! :) Enjoy! :) 


Friday, July 19, 2013

Pleasant Poppies


Happy Saturday!! :) Here is my card for todays Inspiration Challenge. :) I am on vacation this week and thought I would start it off right with a little stamping since I never have time to do it anymore. :-) I used one of my new stamps "Pleasant Poppies!" I seriously am addicted to it! :) I used my stampin up markers, blender pen, and watercolor paper to color my poppies. 

I hope you have a great day! 
Hugs,
Ashley  
Peace Love and Joy

Stamps: Pleasant Poppies from SU
Paper: watercolor paper, gray, and coral
Ink: stazon

Friday, January 11, 2013

Recover Rapidly Card

Happy Friday! I finally got around to doing the Splitcoaststampers sketch challenge! :) What a fun sketch this was! :) I hope you like it! Just a simple fun design! 

Hugs, 
ash-


Stamps: Patterned Occasions (SU!) available Feb 1st, 2013
Paper: Espresso, white, pattern paper
Ink: chocolate chip, more mustard, cherry cobbler
Accessories: Baja Breeze ribbon

Thursday, January 10, 2013

Valentine Treat Mini Card


I absolutely love these colors together. :) I decided to make a little 2 1/2" x 2 1/2" card mini card. Perfect for a gift or small Valentine treat. Wouldn't it be cute with a little piece of candy glued in the middle. :) This was super easy to put together and would be great to bring a little joy to anyone! :) 

Have a great day! 
Ash-

Stamps: Hearts a Flutter from SU!
Paper: vanilla, chocolate
Ink: raspberry
Accessories: red stickles, die cuts, hearts a flutter die cuts, pearls, dimensionals 

Tuesday, January 1, 2013

Happy New Year | 2013

Happy 2013! I hope that everyone had a wonderful and safe New Years Eve! I rang in the New Year with my little guy while daddy went to a friends "grown up" party... lol! Grant was my midnight kiss and we spent the evening crafting, talking, playing, dancing, and all kinds of fun stuff. :) I'll post pictures below from my New Years Eve party with my little one! :) 

Todays Splitcoaststamper challenge was to use GOLD, SILVER, and WHITE together on a card/project! So... I couldn't help but break out my favorite glitter tapes! LOL! I created the entire background out of layers and layers of glitter tape. Then I decided to use this beautiful sentiment is from Stampin' Up! in the "Pursuit of Happiness" stamp set! :) 


We have our annual New Years dinner with my hubbys family today but until then I plan on getting the house picked back up and hopefully relaxing a little! Have a blessed day and Happy New Year! 

Some crafty New Years Eve projects with my little boy, Grant. He is 3 years and 4 months old and loves to craft with me already ! :) 

Hugs, 
Ashley